Ride-On Mower16/09/2024
How to attach and remove a cutting deck on a ride-on lawn mower
This is an article on how to attach and remove a cutting deck on a ride-on lawn mower.
Your Husqvarna ride-on lawn mower comes with a large range of attachments, which you can use for different tasks.
If you want to mow the lawn, you will need to use the cutting deck.
R200-series ride-on lawn mower; remove and attach a cutting deck
Remove a cutting deck
- Put height adjustment lever in service position.
- Lower the cutting deck.
- Engage the parking brake.
- Use the starter key with the attached tool.
- Remove the cover.
- Disconnect the cutting deck rod.
- Release the belt tensioner.
- Disconnect the drive belt.
- Prop the cutting deck to release pressure from the bolt.
- Pull to release.
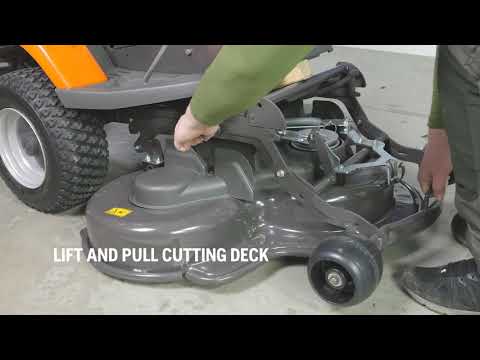
- Lift and pull the cutting deck.
- The piece of wood prevents frame from slamming.
Attach the cutting deck
- Lift into position.
- Mount bolts on both sides.
- Connect the cutting deck rod.
- Connect the drive belt.
- Pull the belt tensioner into position.
- Remember to exit the service position.
R300-series ride-on lawn mower; remove and attach the cutting deck

Remove the cutting deck
- Lower the cutting deck.
- Put height adjustment lever in service position.
- Engage the parking brake.
- Use the starter key with attached tool.
- Remove the cover.
- Release the belt tensioner.
- Disconnect the cutting deck rod.
- Disconnect the drive belt.
- Pull the cutting deck.
- Lift and pull the cutting deck.
Attach the cutting deck
- Align the cutting deck into the position.
- Push into position.
- Connect the drive belt.
- Connect the cutting deck rod.
- Pull the belt tensioner into position.
- Remember to exit the service position.
- Park the product on level ground.
- Set the power switch to the "0" position.
- Set the cutting height lever in the servicing position.
- Release the clip on the front cover with the tool attached to the power switch key, and remove the cover.
- Lift the cutting height stay and put it in the holder for the cutting height stay.
- Disconnect the cable from the cutting deck.
- Disengage the lock to the cutting deck with your left hand. Pull the cutting deck out with your right hand.
- Put a wooden block between the equipment frame and the chassis. This makes sure that the cutting deck does not spring back when removed.
WARNING: Be careful. There is a risk of injury if your hand is caught between the equipment frame and the chassis. - Remove the two screws on the equipment frame.
- Hold the front edge of the cutting deck and pull it out.
- Remove the wooden block.
- Attach the cutting deck in the opposite sequence.
Was this article helpful?
Need more assistance?


